Digital Forensics Investigators commonly find Universal Serial Bus flash drives, known as USB flash drives, as the most common storage devices used as evidence. Investigators must follow a defined procedure for the investigation and conduct it in such a manner that they do not destroy the evidence. So, let us get started with the Forensics Investigation of USB.
Table of Contents
- Detecting last attached USB flash drives in the Windows system
- Using Registry Editor
- Using PowerShell
- Using USBDeview
- Detecting last attached USB flash drives using Metasploit
- Investigating USB flash drives for deleted files
- Creating Disk Image
- Analysing Disk Image
Detecting last attached USB flash drives in the Windows system
The usage of USB drives in place of work may let nasty employees remove sensitive or confidential information from a system without any authorization. To resolve this issue, forensic examination of systems comes into the picture. So, let’s start investigating;
To detect the artifacts of the USB in the windows machine, we can use the manual as well as automated methods.
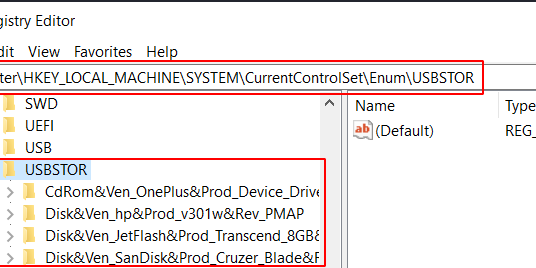
Using Registry Editor
It is a manual method to easily list the information of the last plugged in USB storage devices. Press ‘Windows+R’ and type Registry Editor.
This information can be found in the Windows registry at:
You can see the details like last plugged in USB devices, the vendor of the USB, name of the product, serial number, and version name.

Using PowerShell
This manual method helps find artifacts. You can use the same path in PowerShell to get information on the last plugged-in USB with the following command;

Using USBDeview
To use an automatic method to find artifacts, you can download USBDeview. This tool provides you with an automated and graphical representation of what USB devices connected to the system.

Detecting last attached USB flash drives using Metasploit
When we need to investigate the USB flash drives history remotely, we can use modules in Metasploit in Kali Linux. This module will enumerate USB Drive history on a target host. To use this module, switch on your Linux machine, start msfconsole, and type command;
Set the session number and exploit. Here you will be able to see a history of various USB connected previously.

Now you have also obtained the meterpreter session, so you can use the following command to remotely use PowerShell to get the history of connected USB flash drives;
Once the PowerShell is loaded, you can type,

You can hence see the list of USB Flash drives connected to the system remotely.
Investigating USB flash drives for deleted files.
After we have detected all the USB connection to the system and if the USB Flash drive is available at the scene of the crime. It can be carefully collected in Faraday Bag and now the forensic investigator can investigate the evidence.
At first, it is important to create an image of the USB flash drive that investigators retrieved from the crime scene. To create an image and to analyze, we can use FTK® Imager, which we can download from here.
Creating Disk Image
Step 1:
Install and run AccessData FTK imager

Step 2.
Create a disk image of the USB Drive
A disk image is a bit-by-bit or a sector-by-sector copy of a physical storage device like USB Flash drive, which includes all files, folders and unallocated, free and slack space etc.

Step 3:
As it as USB Flash drive, select Physical Drive and its source to create an image and click on finish.


Step 4:
Add the destination of the image file, and check the box that says verify images that are created.

Step 5:
After you add the destination for the image file you want to create, type the name you want to give the image file and click on finish.

Step 6:
You can see that the image destination is ready, then click on Start to begin imaging.

Step 7:
You see that the image of your USB flash Drive is being created.

Step 8:
After completing the imaging, the system will prompt you with MD% image verification details where it generates a compared and verified hash.

Here the imaging part is over, so we can now move to the analysis of the USB Flash Drive.
Analysing Disk Image
Note: Only the Disk image of the original evidence will undergo investigation.
Step 9:
Click on add evidence item and add the source of the created image file.


Step 10:
Here you see that someone creates an evidence tree and deletes folders in the root folder. Here we will try to retrieve them by clicking on ‘Export files’

Step 11:
You see that someone has retrieved the deleted folder and the contents of the deleted folder.
How to remove usb history from registry* Pls contact me – 084933911039
USB Oblivion is designed to erase all traces of USB-connected drives and CD-ROMs from the registry in Windows.


